WiFi Adapter Driver for Windows 10
How to Update the WiFi Adapter Driver for Windows 10?
To update the WiFi Adapter Driver for Windows 10, you can follow a few steps. Firstly, you should download the latest version of the driver from the official website of the device manufacturer. Secondly, you should open the Command Prompt and type in the details of the wireless adapter driver. These details should include its name, date of release, vendor, provider, type, and manufacturer. Once you have all of these details, paste them into the search box to find the correct driver for your device.
Download WiFi Adapter Driver for Windows 10 (Here)
Update the driver:
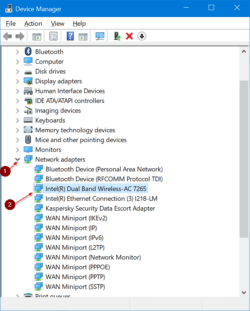
There are two methods to update the WiFi adapter driver for Windows 10. The first is to go to the official website of your wireless adapter. Once downloaded, double-click on it to run the installation process. You can also download free driver updater software, which can automatically detect updates for you. If you’re still unsure about how to update your WiFi driver, you can check the name of the device in Device Manager. Click on the wireless adapter in the list and select Properties. Under the Property tab, select Hardware Ids.
Next, you need to open Device Manager and locate the driver. In the list of devices, you’ll see your WiFi adapter. Right-click on it, click Update Driver Software and follow the on-screen instructions. After installing the new driver, reboot your computer. If the wireless adapter cannot be found, you will need to download the new driver from the manufacturer. If you cannot access the internet, you’ll have to download it onto a USB flash drive and install it manually.
Uninstall the driver:
If your Wi-Fi disappears after you update your WiFi adapter driver, you need to uninstall it before installing the new one. Windows will keep the previous version of the files when you uninstall the new driver, so you must first uninstall the old one. Alternatively, you can uninstall the WiFi adapter driver manually. From the context menu, click Uninstall device. Next, click Attempt to remove the driver for this device and restart your computer. Once you have finished uninstalling the old driver, you can reinstall it.
To install the latest driver, go to the manufacturer’s website. You can also download it from the manufacturer’s website if you have the internet on your PC. Make sure you have the latest version of the driver on your PC before you start this process. If you don’t have internet access, you should use a PC with working internet. Uninstalling the WiFi adapter driver will disconnect your PC from the internet.
Restart your computer:
If your network card hasn’t started working after installing the new WiFi adapter driver for Windows 10, the first step is to restart your computer. The reason why your computer may be unresponsive after restarting is that it’s likely to be the network card itself. Restarting your computer after installing the new WiFi driver is important because it helps your system to find and fix any issues that it may have.
Using Windows’s Network Troubleshooter is a good idea if your computer’s WiFi connection keeps dropping out. This is often caused by issues with Wi-Fi Sense, which can cause temporary disconnections. You can also try disabling the WiFi adapter in the Power Management settings. This should solve the problem. In the future, make sure to download the latest WiFi adapter driver for Windows 10 before restarting your PC.