Intel Chipset Drivers Windows 11 Download
How to Disable Intel Chipset Drivers For Windows 11?
Intel chipset drivers are software instructions that help Windows identify the motherboard in your computer and work with it. These drivers are important, and keeping them updated is recommended.
Download Intel Chipset Drivers Windows 11 (Here)
If you’re experiencing issues with a yellow “!” mark in Device Manager, this is likely due to missing or outdated chipset drivers. This article will teach you how to update your Intel chipset drivers in a few simple steps.
How to Update Your Intel Chipset Drivers?
Chipset drivers are essential for the motherboard of a computer to communicate with its other components like the CPU, RAM, and video cards. Without chipset drivers, your system wouldn’t be able to understand the commands that you input into it and would perform them incorrectly. As such, it’s important that you keep your drivers up to date.
One way to do this is through Windows Update, which will automatically download and install new driver updates as they become available. You can also manually update your drivers through the Device Manager. To do this, open the Device Manager by pressing Windows + X and expanding Display adapters. Right-click on your Intel graphics driver and select Update driver software.
Another option is to use a third-party program such as Driver Booster, which will scan your system and find outdated drivers for you. This program will then recommend the best driver for your system and download and install it for you.
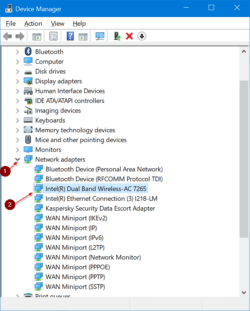
How to Check Your Current Intel Chipset Version?
Chipset drivers play an important role in your computer system. They facilitate communication between different components, including the video card, processor, and hard drives. Because of this, it is important to keep your chipset drivers updated.
One way to check your current Intel Chipset driver version is by using Windows’ built-in Device Manager. To do this, press the Windows key and then type “msinfo32.” This will open a window with detailed information about your computer system.
Click the Hardware tab and then click the IDE ATA/ATAPI Controllers entry. You will see the chipset driver version in the Driver Version field. Another way to check your chipset driver version is to use a third-party program such as Advanced Driver Updater. This program is capable of automatically finding outdated drivers and downloading the latest versions. It is also easy to install and does not require any technical knowledge.
How to Install Your Intel Chipset Drivers?
A chipset is an electronic chip that manages the flow of data between different components on a motherboard. It is sometimes referred to as the “traffic controller” of the motherboard, and it helps connect the CPU, RAM, graphics card, and other peripherals.
The Intel Chipset Device Software, also known as the Intel driver package or chipset drivers, is a set of Windows* INF files that enable your operating system to recognize and communicate with the integrated hardware on your Intel motherboard. These drivers are a critical piece of software for Intel motherboard owners, and they should be installed as soon as possible after a fresh OS install.
To update your chipset drivers, you can either use the Windows device manager or download a third-party tool such as Driver Booster. This tool scans your computer for missing or outdated drivers and automatically updates them. It is a convenient and safe way to get your drivers up to date.
How to Disable Your Intel Chipset Drivers?
Whether they’re outdated, incompatible with your hardware, or causing problems, you may want to disable Intel chipset drivers. The good news is that you can do this in a few easy steps.
First, make sure that you’re logged in with an account that has administrator privileges. Also, close any open applications and temporarily disable your antivirus software to prevent conflicts during the driver installation process.
Once you’ve done that, open Device Manager and expand the Display Adapters category. Right-click the Intel Graphics entry and select Uninstall device. When the device removal window appears, check the Delete the driver software for this device option.
Alternatively, you can also try using the kernel parameter i915.enable_dc=0. This disables GPU power management and has been reported to solve random hangs in some Intel systems. However, keep in mind that this may result in higher power usage and shorter battery life on laptops/notebooks. Moreover, it may not work with compositor desktop environments like GNOME or KDE Plasma.