Intel Bluetooth Driver Windows 11

How Do I Install and Update the Intel Bluetooth Driver on My Windows 11 PC?
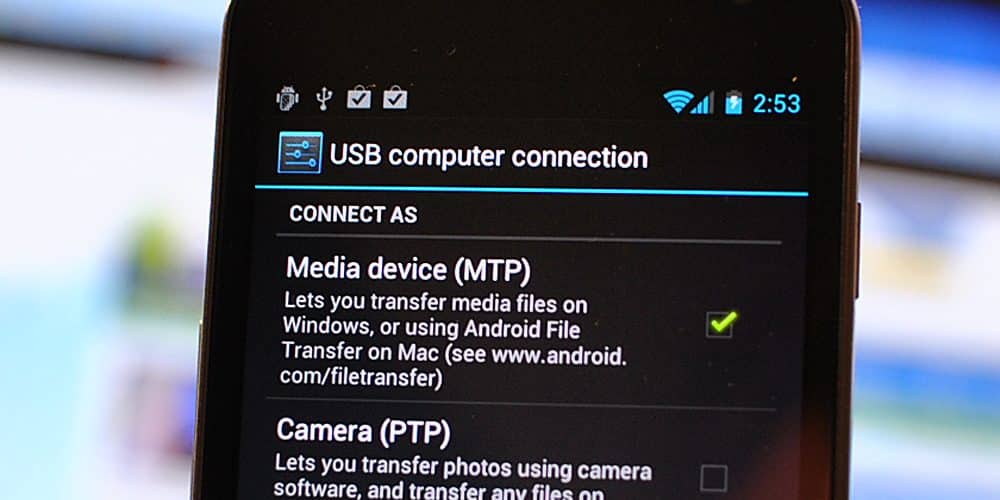
How do I install and update the Intel Bluetooth Driver on my Windows 11 PC? There are two ways to do this. One way is using the device manager, which you can find in the Start Menu. To find it, you should type “device manager” into the search box and select the appropriate option from the list. If you do not see the Bluetooth device listed, you can search for it by name or click the search icon to get started.
Download Intel Bluetooth Driver Windows 11 (Here)
Installing the Bluetooth driver:
There are two ways to install the latest Intel Bluetooth driver for Windows 11. If you’re using a laptop or desktop, you can use the Device Manager to download the latest version. You can also run a driver updater like Driver Easy to scan your system and install any outdated drivers. Once you’ve downloaded the latest version of the driver, you can follow the steps outlined in the manual below. This method is generally recommended when you’re dealing with hardware problems.
To install the latest driver, you need to use the device manager tool in Windows 10. This tool will automatically detect and download the latest driver for your Bluetooth hardware. Next, open the Device Manager and search for the driver that meets your system’s requirements. If you can’t find the driver, you can go to the Bluetooth manufacturer’s website and download the latest driver manually. This will take just a few minutes and will not cause any problems.
Updating the Bluetooth driver:
Updating the Intel Bluetooth driver for Windows 11. You can install it from the Settings app. If you don’t have the software installed, you can download the latest driver from the Device Manager. The driver will then automatically install. If you’re using Windows 10, you can also use the Windows Device Manager. Look for a yellow driver mark. Then, click Update driver. If the update is successful, you’ll see a popup telling you that the new driver is installed and ready to use.
To update the Bluetooth driver, you’ll need to uninstall the previous one. You can find it by browsing the location on your local drive. If you don’t want to use Device Manager, you can manually pick it up from the local drive. When you’re done, simply restart your computer and it should automatically install the new driver. If you don’t want to go through the hassle of manually updating the Bluetooth driver, you can also use Windows Update to check for driver updates.
Using device manager to install the driver:
Using a device manager to install the Intel Bluetooth drivers is an easy way to resolve most of the common problems with your Bluetooth hardware. It creates a bridge between your hardware and the operating system. While Windows 10 automatically installs the Intel Bluetooth driver, you may notice that it is corrupt or missing, or you might have noticed a yellow “fail” mark on the device. Either way, this can cause Bluetooth issues and will require a manual install or uninstalling of the driver.
To uninstall the driver, you must restart the PC and disable fast startup. To do this, go to the Bluetooth node and right-click on it. From there, select “uninstall”. Then, you need to restart the computer. Once the installation is complete, restart the PC to apply the changes. Then, you can reinstall the Intel Bluetooth driver. To uninstall the driver, follow the steps above, but be sure to remove any Bluetooth software before restarting your PC.: